Are you eager to dive into the world of PHP web development? Look no further! In this comprehensive guide, we’ll walk you through the creation of a simple PHP MVC (Model-View-Controller) framework from scratch. Whether you’re a beginner or an experienced developer looking to enhance your skills, this tutorial is designed to equip you with the knowledge and confidence to build robust web applications using industry-standard practices.

Understanding MVC Architecture
Before we delve into the practical implementation, let’s grasp the fundamentals of MVC architecture. MVC, which stands for Model-View-Controller, is a powerful design pattern widely used in web application development. It divides an application into three interconnected components:
- Model (M): Responsible for handling data and business logic.
- View (V): Deals with the presentation layer, showcasing data to users.
- Controller (C): Acts as an intermediary between the Model and the View, handling user input and directing data flow.
By separating concerns, MVC promotes maintainability, scalability, and code reusability, making it an indispensable tool for modern web development.
Setting Up Your Project Environment
To kickstart our journey, let’s set up a new PHP MVC project. We’ll cover the essential prerequisites and directory structure to ensure a streamlined development process. Key prerequisites include a basic understanding of PHP OOP concepts, familiarity with Composer (the PHP package manager), and basic HTML/CSS knowledge for front-end development.
Setting up the Project
Create a new directory for your project and open it in your favorite editor. Then, in the terminal, run composer init to initialize a new Composer project.
>composer init
You can press enter, leaving all the questions empty except for the dev dependencies. When you are asked to add the dependencies and dev dependencies, type “no” and press enter for now.
Once completed, you will see a message like this:
“PSR-4 autoloading configured. Use “namespace user\phpmvc;” in src/”
For simplicity, we’ll change the namespace to something shorter, such as App. To do that, change the key of the “psr-4” in composer.json file:“user\\phpmvc\\” -> “App\\”
Then, run composer dump-autoload to which will update the classes that must be included in the project.
Directory Structure
public/ # this is where the domain is pointed
src/
Controllers/
Models/
Routes/
Views/
vendor/ # automatically created by the composer
Building the Core Components
With our project environment ready, it’s time to dive into the core components of our MVC framework. We’ll start by creating the Router, responsible for mapping URLs to appropriate controllers and actions. Next, we’ll define Controllers to handle user requests and Views to render the presentation layer. By adhering to the MVC principles, we ensure clear separation of concerns and maintainable codebase.
Setting up the public folder
Create a new file called index.php in the public/ folder. This file will serve as the entry point of the application.
index.php
<?php
// index.php - Entry point of the application

// Require the Composer autoloader to autoload classes
require '../vendor/autoload.php';

// Create an instance of Router to handle routing
$router = require '../src/Routes/index.php';
Handling the Routes
Create a Router.php file inside src/ folder. This will map the routes to the correct controller.
router.php
<?php
// Router.php - Class to handle routing

namespace App;

class Router
{
    // Array to store routes
    protected $routes = [];

    // Method to add a route
    private function addRoute($route, $controller, $action, $method)
    {
        // Store route details in the routes array
        $this->routes[$method][$route] = ['controller' => $controller, 'action' => $action];
    }

    // Method to define a GET route
    public function get($route, $controller, $action)
    {
        $this->addRoute($route, $controller, $action, "GET");
    }

    // Method to define a POST route
    public function post($route, $controller, $action)
    {
        $this->addRoute($route, $controller, $action, "POST");
    }

    // Method to dispatch routes
    public function dispatch()
    {
        // Get the requested URI and method
        $uri = strtok($_SERVER['REQUEST_URI'], '?');
        $method = $_SERVER['REQUEST_METHOD'];

        // Check if the requested route exists
        if (array_key_exists($uri, $this->routes[$method])) {
            // Retrieve controller and action for the route
            $controller = $this->routes[$method][$uri]['controller'];
            $action = $this->routes[$method][$uri]['action'];

            // Create an instance of the controller and call the action
            $controller = new $controller();
            $controller->$action();
        } else {
            // Throw an exception if route not found
            throw new \Exception("No route found for URI: $uri");
        }
    }
}
Now, to set the initial route, create aindex.php file inside src/Routes/ folder. You can map the routes for POST and GET requests here separately.
<?php
// index.php inside src/Routes/ folder

use App\Controllers\HomeController;
use App\Router;

$router = new Router();

// Define a route for the home page
$router->get('/', HomeController::class, 'index');

// Dispatch routes
$router->dispatch();
Controllers — Handling the home page
First, create a Controller.php inside the src/ folder.
<?php
// Controller.php inside src/ folder

namespace App;

class Controller
{
    // Method to render views
    protected function render($view, $data = [])
    {
        // Extract data for use in the view
        extract($data);

        // Include the view file
        include "Views/$view.php";
    }
}
Now, we need to add a HomeController to handle the request. Inside thesrc/Controllers/ folder, create HomeController.php with an index method to handle the home page.
<?php
// HomeController.php inside src/Controllers/ folder

namespace App\Controllers;

use App\Controller;

class HomeController extends Controller
{
    // Method to handle the home page request
    public function index()
    {
        // Render the index view
        $this->render('index');
    }
}
Now, let’s add some Journals to the Home page. Update the HomeController.php to load come Journals.
<?php

namespace App\Controllers;

use App\Controller;
use App\Models\Journal;

class HomeController extends Controller
{
    public function index()
    {
        $journals = [
            new Journal('My Third Journal Entry', '2023'),
            new Journal('My Second Journal Entry', '2022'),
            new Journal('My First Journal Entry', '2021')
        ];
        $this->render('index', ['journals' => $journals]);
    }
}
Creating a Model
Create a new file Journals.php inside the Models/ directory. This represents the Journals in the application.
<?php

namespace App\Models;

class Journal
{
    public $name;
    public $publishedYear;

    public function __construct($name, $publishedYear)
    {
        $this->name = $name;
        $this->publishedYear = $publishedYear;
    }
}
Adding the Views
Finally, to serve the home page, create index.php file inside thesrc/Views/ folder.
<!-- index.php inside src/Views/ folder -->

<!-- HTML content for the home page -->
<h1>Welcome to Simple PHP MVC Starter!</h1>

<ul>
    <?php foreach ($journals as $journal) : ?>
        <!-- Display journal name and published year -->
        <li><?= $journal->name ?> (<?= $journal->publishedYear ?>)</li>
    <?php endforeach; ?>
</ul>
Testing the progress
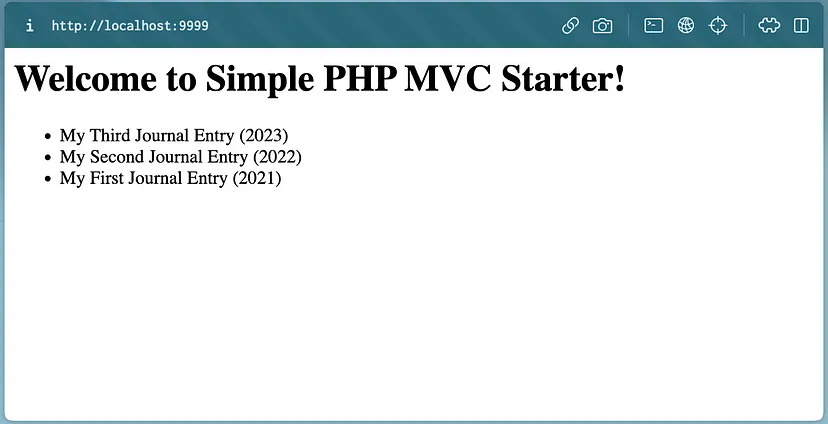
Now, the app is ready to serve the home page. Navigate to the public folder and run the built-in PHP web server to test it.
>cd phpmvc
>php -S localhost:9999
If everything works, you should see this in the browser:

Conclusion: Empowering Future Web Developers
Congratulations! You’ve successfully built your first PHP MVC framework from scratch. While this tutorial provides a solid foundation, remember that mastering web development is an ongoing journey. By continuously honing your skills and exploring advanced concepts, you’ll be well-equipped to tackle complex projects and make meaningful contributions to the ever-evolving tech landscape.
In conclusion, embracing MVC architecture empowers developers to build scalable, maintainable web applications. Whether you’re a student at CSLab Sikar or an aspiring developer elsewhere, the skills acquired through this tutorial will undoubtedly propel your career forward. So, roll up your sleeves, explore the example code on GitHub, and embark on your journey to becoming a proficient PHP developer. Happy coding!


