Hey there! Vishnu Rajoria here from CSLAB Computer Institute in Sikar. As a coding instructor and full stack developer, I love sharing simple yet powerful web development techniques. Today, let’s dive into creating animated progress bars using HTML, CSS, and JavaScript.
What We’re Building
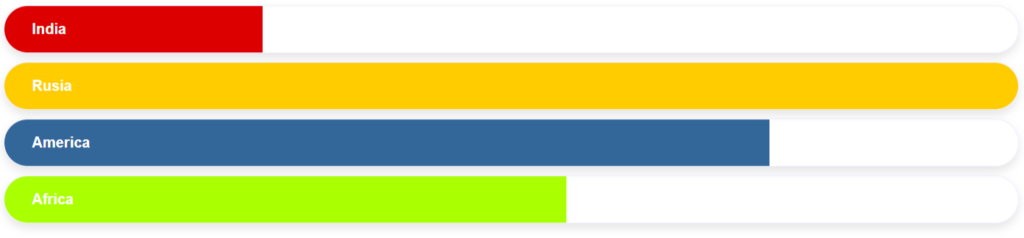
We’re going to create colorful, animated progress bars that fill up to a specified percentage. This is great for displaying stats, survey results, or any kind of comparative data.
The Ingredients
We’ll use three key components:
- HTML for structure
- CSS for styling
- JavaScript for animation
Breaking It Down
HTML
- We create a container for each progress bar
- Each bar has a class for styling and a
data-lengthattribute to set its final width
CSS
- We style the container (
.progress-bar-area) to give it a nice rounded shape - The progress bar itself (
.progress) gets colored and sized - We define color classes (
.red,.orange, etc.) for variety
JavaScript
- We select all progress bars
- For each bar, we animate its width from 0% to the specified
data-length - The animation runs every 10 milliseconds, creating a smooth fill effect
See the Pen Progress Bars Using Javascript by CSLAB Software Development and Computer Training (@CSLAB) on CodePen.
HTML CODE
<!-- Main container -->
<div>
  <!-- Progress bar for India -->
  <div class="progress-bar-area">
    <div data-length="20" class="progress red">India</div>
  </div>

  <!-- Progress bar for Russia -->
  <div class="progress-bar-area">
    <div data-length="100" class="progress orange">Rusia</div>
  </div>

  <!-- Progress bar for America -->
  <div class="progress-bar-area">
    <div data-length="70" class="progress blue">America</div>
  </div>

  <!-- Progress bar for Africa -->
  <div class="progress-bar-area">
    <div data-length="50" class="progress green">Africa</div>
  </div>
</div>
CSS CODE
/* Styling for the container of each progress bar */
.progress-bar-area {
  width: 100%;
  height: 50px;
  margin-bottom: 10px;
  border-radius: 50px;
  overflow: hidden;
  font-family: "arial";
  border: 1px solid #eef;
  box-shadow: 0px 5px 10px rgba(0,0,0,0.1);
}

/* Styling for the progress bar itself */
.progress {
  height: 50px;
  width: 100%;
  line-height: 50px;
  color: #fff;
  font-weight: bold;
  padding: 0px 30px;
  overflow: hidden;
}

/* Overlay styling (not used in the provided HTML) */
.overlay {
  width: 100%;
  height: 25px;
  margin-bottom: -25px;
  background: rgba(0,0,0,1);
}

/* Color classes for different progress bars */
.red {
  background: #d00;
}

.orange {
  background: #Fc0;
}

.blue {
  background: #369;
}

.green {
  background: #aF0;
}
JAVASCRIPT CODE
// Function to initiate the progress bar animation
function showProgressBar() {
  var selectedProgressBars = document.getElementsByClassName("progress");
  var element_counter = selectedProgressBars.length;

  for(var i = 0; i < element_counter; i++) {
    animateProgress(selectedProgressBars, i);
  }
}

// Function to animate a single progress bar
function animateProgress(selectedProgressBars, index) {
  var progressLength = 0;
  var maxProgressLength = selectedProgressBars[index].getAttribute('data-length');

  var timeInterval = setInterval(function() {
    if(progressLength <= maxProgressLength) {
      selectedProgressBars[index].style.width = progressLength + '%';
      progressLength++;
    } else {
      clearInterval(timeInterval);
    }
  }, 10);
}

// Call the function to start the animation
showProgressBar();
Key Takeaways
- Use
data-attributes in HTML to store custom data - CSS can create appealing visual effects with minimal code
- JavaScript’s
setInterval()is great for creating animations
Why This Matters
As a developer, you’ll often need to visualize data. This technique is:
- Lightweight (no heavy libraries needed)
- Customizable (easy to adjust colors, sizes, speeds)
- Interactive (engages users better than static graphics)
Remember, the best code is often the simplest. This example shows how you can create engaging UI elements with just a few lines of each language.
Happy coding, and feel free to reach out if you have any questions!