Hey there! Vishnu Rajoria here from CSLAB Computer Institute in Sikar. As a coding instructor and full stack developer, I love sharing simple yet powerful web development techniques. Today, let’s break down how to create a sleek multiple options select menu using HTML, CSS, and JavaScript.
Why This Matters
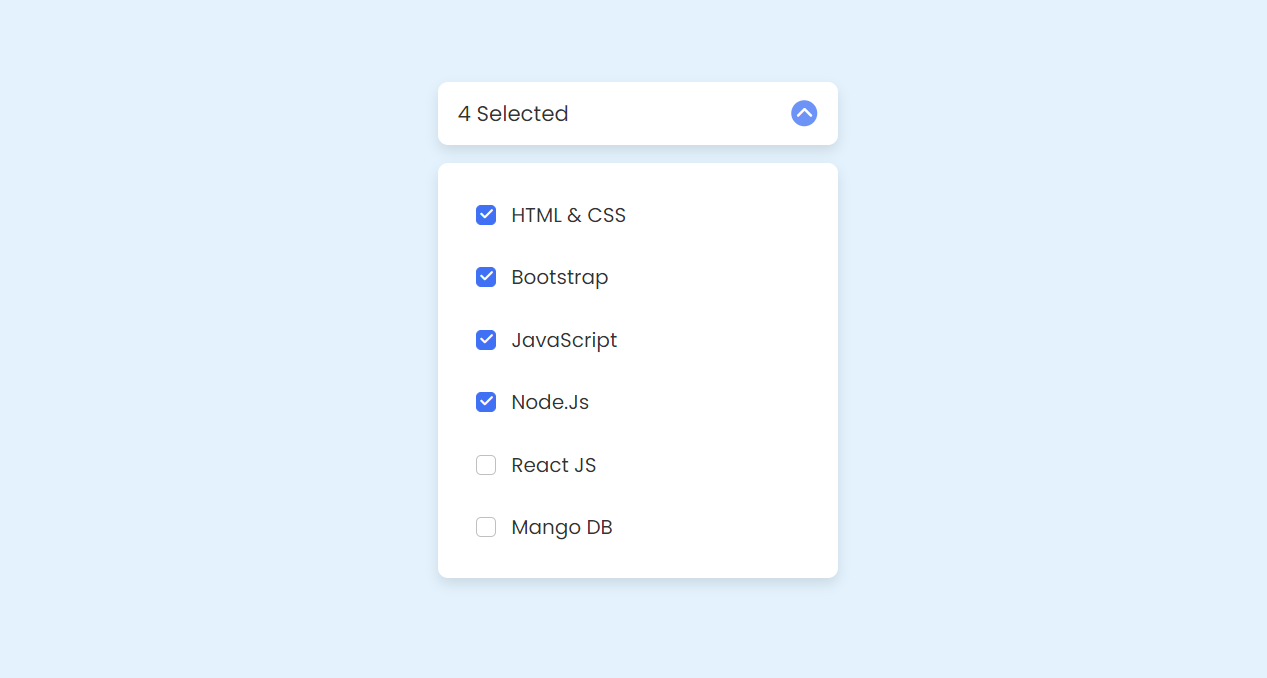
In web development, user interaction is key. A well-designed select menu can make your website more intuitive and engaging. This particular design allows users to:
- Select multiple options easily
- See their selections at a glance
- Toggle the menu open and closed smoothly
The Basic Structure
We’re using a combination of HTML for structure, CSS for styling, and JavaScript for interactivity. Here’s what each part does:
- HTML: Creates the skeleton of our menu
- CSS: Makes it look good and responsive
- JavaScript: Brings it to life with user interactions
See the Pen DROPDOWN MENU JAVASCRIPT by CSLAB Software Development and Computer Training (@CSLAB) on CodePen.
HTML CODE
<!DOCTYPE html>
<html lang="en">
<head>
    <meta charset="UTF-8">
    <meta http-equiv="X-UA-Compatible" content="IE=edge">
    <meta name="viewport" content="width=device-width, initial-scale=1.0">
    <title>Multiple Options Select Menu</title>

    <!-- Link to Font Awesome CSS for icons -->
    <link rel="stylesheet" href="https://cdnjs.cloudflare.com/ajax/libs/font-awesome/6.1.1/css/all.min.css">
</head>
<body>
    <!-- Main container for the select menu -->
    <div class="container">
        <!-- Button to open/close the select menu -->
        <div class="select-btn">
            <span class="btn-text">SELECIONE SUA DISCIPLINA</span>
            <span class="arrow-dwn">
                <i class="fa-solid fa-chevron-down"></i>
            </span>
        </div>

        <!-- List of selectable items -->
        <ul class="list-items">
            <!-- Each list item represents a selectable option -->
            <li class="item">
                <span class="checkbox">
                    <i class="fa-solid fa-check check-icon"></i>
                </span>
                <span class="item-text">HTML & CSS</span>
            </li>
            <!-- Repeat similar structure for other items -->
            <!-- ... -->
           <li class="item">
                    <span class="checkbox">
                        <i class="fa-solid fa-check check-icon"></i>
                    </span>
                    <span class="item-text">Bootstrap</span>
                </li>
                <li class="item">
                    <span class="checkbox">
                        <i class="fa-solid fa-check check-icon"></i>
                    </span>
                    <span class="item-text">JavaScript</span>
                </li>
                <li class="item">
                    <span class="checkbox">
                        <i class="fa-solid fa-check check-icon"></i>
                    </span>
                    <span class="item-text">Node.Js</span>
                </li>
                <li class="item">
                    <span class="checkbox">
                        <i class="fa-solid fa-check check-icon"></i>
                    </span>
                    <span class="item-text">React JS</span>
                </li>
                <li class="item">
                    <span class="checkbox">
                        <i class="fa-solid fa-check check-icon"></i>
                    </span>
                    <span class="item-text">Mango DB</span>
                </li>

        </ul>
    </div>

    <!-- Link to external JavaScript file -->
    <script src="script.js"></script>
</body>
</html>
CSS CODE
/* Import Google Fonts - Poppins */
@import url('https://fonts.googleapis.com/css2?family=Poppins:wght@300;400;500;600&display=swap');

/* Reset default styles and set font family */
* {
    margin: 0;
    padding: 0;
    box-sizing: border-box;
    font-family: 'Poppins', sans-serif;
}

/* Set background color for the body */
body {
    background-color: #e3f2fd;
}

/* Style the main container */
.container {
    position: relative;
    max-width: 320px;
    width: 100%;
    margin: 80px auto 30px;
}

/* Style the select button */
.select-btn {
    display: flex;
    height: 50px;
    align-items: center;
    justify-content: space-between;
    padding: 0 16px;
    border-radius: 8px;
    cursor: pointer;
    background-color: #fff;
    box-shadow: 0 5px 10px rgba(0, 0, 0, 0.1);
}

/* Style the button text */
.select-btn .btn-text {
    font-size: 17px;
    font-weight: 400;
    color: #333;
}

/* Style the arrow icon */
.select-btn .arrow-dwn {
    display: flex;
    height: 21px;
    width: 21px;
    color: #fff;
    font-size: 14px;
    border-radius: 50%;
    background: #6e93f7;
    align-items: center;
    justify-content: center;
    transition: 0.3s;
}

/* Rotate arrow when select menu is open */
.select-btn.open .arrow-dwn {
    transform: rotate(-180deg);
}

/* Style the list of items */
.list-items {
    position: relative;
    margin-top: 15px;
    border-radius: 8px;
    padding: 16px;
    background-color: #fff;
    box-shadow: 0 5px 10px rgba(0, 0, 0, 0.1);
    display: none;
}

/* Show list items when select menu is open */
.select-btn.open ~ .list-items {
    display: block;
}

/* Style individual list items */
.list-items .item {
    display: flex;
    align-items: center;
    list-style: none;
    height: 50px;
    cursor: pointer;
    transition: 0.3s;
    padding: 0 15px;
    border-radius: 8px;
}

/* Hover effect for list items */
.list-items .item:hover {
    background-color: #e7edfe;
}

/* Style item text */
.item .item-text {
    font-size: 16px;
    font-weight: 400;
    color: #333;
}

/* Style checkbox */
.item .checkbox {
    display: flex;
    align-items: center;
    justify-content: center;
    height: 16px;
    width: 16px;
    border-radius: 4px;
    margin-right: 12px;
    border: 1.5px solid #c0c0c0;
    transition: all 0.3s ease-in-out;
}

/* Style checked checkbox */
.item.checked .checkbox {
    background-color: #4070f4;
    border-color: #4070f4;
}

/* Style check icon */
.checkbox .check-icon {
    color: #fff;
    font-size: 11px;
    transform: scale(0);
    transition: all 0.2s ease-in-out;
}

/* Show check icon when item is checked */
.item.checked .check-icon {
    transform: scale(1);
}
JAVASCRIPT CODE
// Select DOM elements
const selectBtn = document.querySelector(".select-btn");
const items = document.querySelectorAll(".item");

// Toggle 'open' class on select button when clicked
selectBtn.addEventListener("click", () => {
    selectBtn.classList.toggle("open");
});

// Add click event listener to each item
items.forEach(item => {
    item.addEventListener("click", () => {
        // Toggle 'checked' class on clicked item
        item.classList.toggle("checked");

        // Update button text based on number of checked items
        let checked = document.querySelectorAll(".checked");
        let btnText = document.querySelector(".btn-text");

        if (checked && checked.length > 0) {
            btnText.innerText = `${checked.length} Selected`;
        } else {
            btnText.innerText = "Select Language";
        }
    });
});
Key Features
- Expandable Menu: Click to open, click again to close
- Multiple Selections: Choose as many options as you want
- Visual Feedback: Checkmarks appear next to selected items
- Dynamic Text: The main button updates to show how many items are selected
Quick Tips for Implementation
- Use Font Awesome for easy-to-implement icons
- Leverage CSS transitions for smooth animations
- Keep your JavaScript simple with event listeners and classList toggles
Why It Works
This design is effective because it’s:
- Intuitive: Users instantly understand how it works
- Compact: It doesn’t take up much space when closed
- Informative: It clearly shows what’s selected
Remember, the goal is to make things easier for your users. This select menu does just that by presenting information clearly and allowing for easy interaction.
Want to see how it’s done? Check out the code snippets in the comments below, and feel free to ask any questions!
Happy coding, everyone!